
Installing a sprinkler system saves a lot more than time and hassle. It is more cost-effective, better for the environment and allows you the peace of mind of not having to worry about fighting to keep your lawn in pristine condition all year. And it is easier than you think!
To install a sprinkler system, you will first need to dial 811 and have the location of all public utilities running through your yard marked. Next, put together a plan on graph paper that considers the design of your yard, the functionality you want, and the type of grass to be put in, using the exact measurements of your yard. This will help you calculate how much of each required material you will need. Next, using landscape paint, draw your graphed out design on the ground in your yard. Once this is done dig the trenches where the pipes will rest. Begin laying your PVC pipe after connecting to the main water supply using PVC glue and a variety of straight, angled and T-connectors. You will connect the sprinkler heads themselves using either threaded T-connectors or threaded right angle connectors and risers. Finally, fill and tamp the trenches, run your wiring from the valves to the timing control box, adjust each sprinkler head and program the timing control box.
In the rest of this article, I will go over each of these steps in more detail. My goal is to provide you will all of the information you need to feel confident in installing your very own sprinkler system for a mere portion of the cost of hiring a professional!
Planning Out Your Sprinkler System
There is a lot of planning that goes into installing a sprinkler system successfully. Before breaking ground, several factors need to be considered and/or completed including design, function, required materials, the type of grass best suited to your area and climate, and dialing 811 to get information on public utility lines that might be buried where you will be digging.
Although there are many variables when dealing with water and water systems fed by public utilities (things like static pressure, which is the water pressure with the faucet, line or spigot turned off, and working pressure, which is the water pressure with the line turned on), a good rule to follow is to not load more than five sprinkler heads on a single valve and line. This will ensure the water pressure to an individual line or multiple sprinkler heads is sufficient for the system to operate properly. Keep this information in mind when designing and laying out the expected coverage area for your sprinkler system.
There are a multitude of considerations to ruminate regarding the design and layout of your sprinkler system. For example, are you installing a sprinkler system under an existing lawn, are you changing the layout and functionality of your yard entirely, do you have a blank canvas, is there an existing sprinkler system installed and you will be adding to or changing the layout, or do you need to trench a line all the way from the water source (likely the water meter for your home or well water with a pump)?
The remainder of this article will cover the most in-depth scenario, where you will be installing a new sprinkler system with no existing underground plumbing. If your individual situation differs, simply cut out the steps that are not applicable.

I highly recommend PVC pipe, plastic fixed-level risers, plastic 360-degree adjustable sprinkler heads, and the appropriate valves for both the static and working pressure of your supply lines to ensure the system functions at peak levels for an extended period of time.
Fixed-level risers (found in multiple lengths) offer a greater resistance to pressure and torque than adjustable ones that can be cut to the desired size, which will come into play when we discuss setting your sprinkler system up in a later section.
Adjustable 360-degree sprinkler heads give you the most flexibility when installing your system and are a cheap and easy way to save valuable time and multiple trips to and from your local hardware store! Again, we will discuss this later when we talk about installing your system.
Sprinkler valves come in many different shapes, sizes and capabilities, so ensure the ones you ultimately purchase are the right fit for the number of sprinkler heads you plan on installing on a single valve and line (remember, no more than five per valve!).
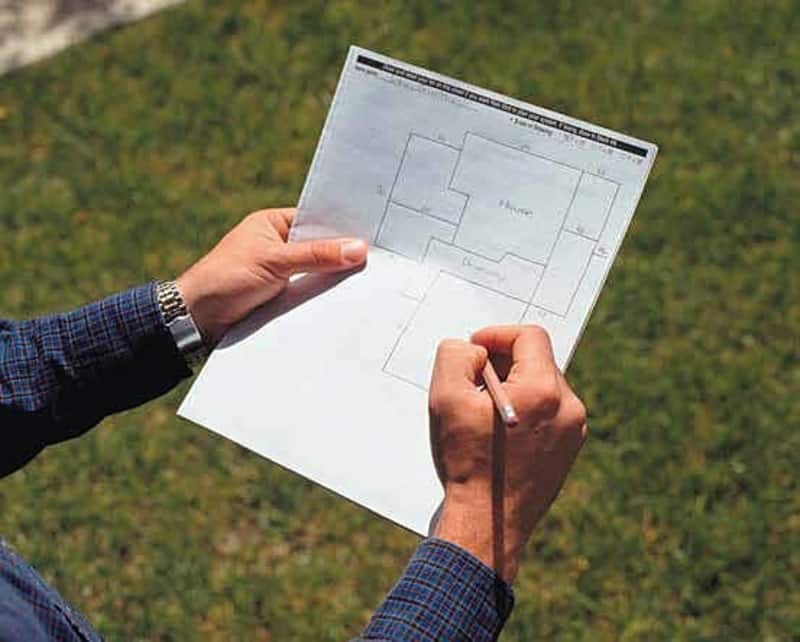
With the correct materials in mind and the design of your yard in place, create an outline of your yard by taking measurements for the required area and transfer the measurements onto graph paper for ease of scale. This will allow you to see how many sprinkler heads are needed, how many lines and valves are needed, how much PVC piping is needed to complete the project, and the overall layout of each individual line.
Now that the plan is in place, it is time to get your hands dirty!
How To Mark Out And Dig Your Trenches
It is best to transfer the design from paper to the actual surface you will be working on prior to breaking ground. To do this, pick up a can of landscaping spray paint from your local hardware store and mark the locations of all of the lines and sprinkler heads, again ensuring not to allocate more than five sprinkler heads to a single line and valve.
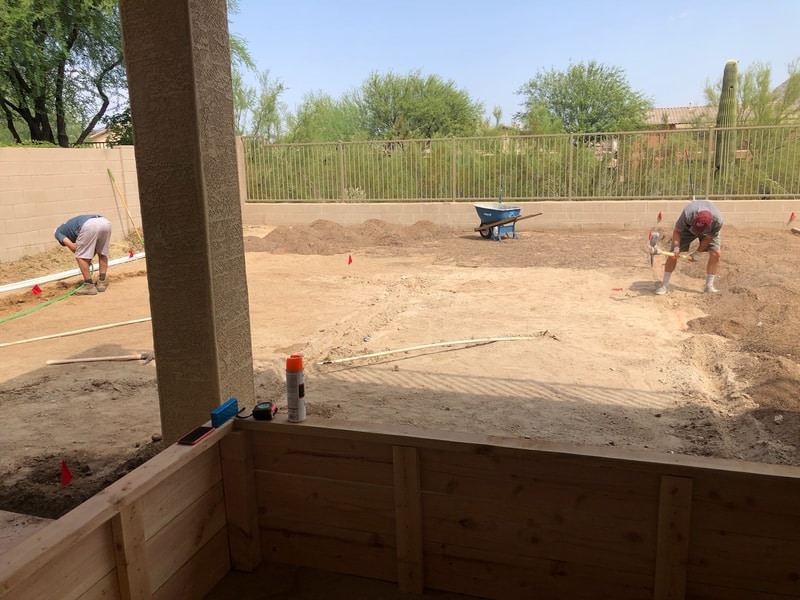
Once you have a visual representation of the layout, work can begin on digging the trenches for the underground lines. If going the manual approach, a trenching tool, shovel or pick axe work best, depending on the density and rock content of the dirt (the harder and more compact the dirt, the more force will be needed to dig the trenches; a pick axe works best in this instance). A motorized trenching tool can be rented from your local hardware store to save time, effort and your back!
Make sure the trenches are dug eight to twelve inches in depth to ensure the grass seed or sod laid over top has sufficient room for the roots to mature. It is also best to keep the dirt removed nearby to be used later to fill the trenches.
Connecting to Main Water Line
In addition to trenching where the lines will be laid in the yard, you will need to dig a trench leading to the water source (likely your primary water meter) and dig out an area for the valve manifold (where the valves will be located, allowing access for any maintenance work). Check with your local municipality on whether or not they require exposed (above ground) water lines to be copper or if PVC can be used. Most of the time, copper is required for all above ground lines to adhere to building codes and PVC can be used beneath ground.
Regardless of whether or not there is an existing additional spigot attached to your water meter, if your jurisdiction requires all above ground water pipe to be copper it is best to enlist the services of a professional plumber (unless you have experience sawdering and connecting copper pipe!). To speed up this process, ensure your trenching is complete prior to the plumber arriving.
In addition to connecting copper piping to your water source, ensure the plumber connects a backflow prevention device, which is designed to prevent any chemicals or sediment from returning from your sprinkler system to your main water supply. Simply talk to your plumber prior to his or her arrival and let them know that you are installing an underground sprinkler system and require a connection to your main water line and a backflow prevention device.
Building Your Sprinkler System
The first step to actually building your new sprinkler system is to run the PVC pipe from the water supply to the valve manifold. PVC piping is extremely easy to work with as it can be cut with a simple hand saw. To connect pieces of PVC pipe together, use a specialized PVC glue and PVC couplers found at your local hardware store. For any bends or turns, angled PVC connectors should be used.
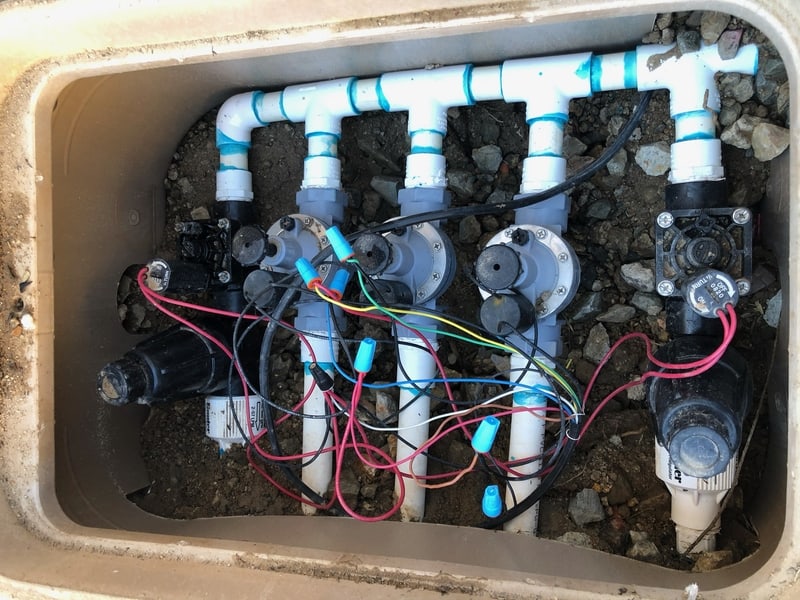
Once the piping reaches the valve manifold area, utilize T-connectors in series from the main line to feed each valve with straight PVC pipe connected through the opposite end. Again, the number of valves needed for your particular project depends on the number of sprinkler heads needed for full coverage. Each valve comes complete with wiring already assembled to be connected to your timer control box in a later step.
Once the valve manifold has been assembled, cover the affected area with a valve manifold box for ease of access for any maintenance required in the future. You may need to alter the shape of the box to fit your specific valve assembly. To do this, simply use an angle grinder, circular saw or Sawzall and trim the box to fit your assembly. Fill in dirt around the assembly to ensure the valve manifold box rests level.
From here, continue connecting and laying PVC pipe until you reach the location of a sprinkler head. For the sprinkler heads themselves, utilize threaded T-connectors (with smooth connectors on each straight opening and the threaded portion pointing up). These threaded portions are where you connect the actual sprinkler head to the T-connector using plastic risers. Risers are simply a piece of plastic with threaded portions on each end that screw into both the bottom of the sprinkler head and the threaded portion of the T-connector.
Continue running your piping and repeating the above steps for all sprinkler heads on each line. At the end of each individual line, utilize a right angle threaded connector instead of a T-connector to connect the final sprinkler head on each line.
If you need to adjust the height (or depth) of a sprinkler head, simply purchase longer risers to be connected from the sprinkler to the PVC receptor. The sprinkler head should sit between one and a half inch to two inches above the dirt. This is important because the grass and roots will require one and a half to two inches for a healthy lawn. Any higher and you run the risk of breaking a sprinkler head when mowing the lawn and any lower and you run the risk of the head being buried by grass.
Filling Trenches
Now that the lines are run and connected to your main water supply through the controlling valves, it is time to fill the trenches.
Filling the trenches is an extremely important step! If done incorrectly, you could see settling over time in your beautiful new lawn.
To ensure you avoid any settling in the future in the areas where trenching took place, fill in the trenches with the dirt that was previously dug and wet the entire area with a hose. Allow the water to settle into the dirt for fifteen to twenty minutes before tamping down the dirt with a hand tamper or motorized tamping machine (which can also be rented from your local hardware store).
Repeat this process four to five times to make sure the ground is as compact as possible. You will know the process is complete when the ground does not give or settle at all when walked on. If the trenched areas are not level with the rest of the yard, add dirt before watering and tamping.
Wiring Your Sprinkler Control Box
The timer control box is the brains of the operation, allowing you to program when and how frequently to water the yard. As I alluded to earlier, each valve comes pre-wired in order to be able to be connected to the timer control box. Wiring for sprinkler systems comes in a multitude of varieties, but all should be weather proof in order to survive the elements.
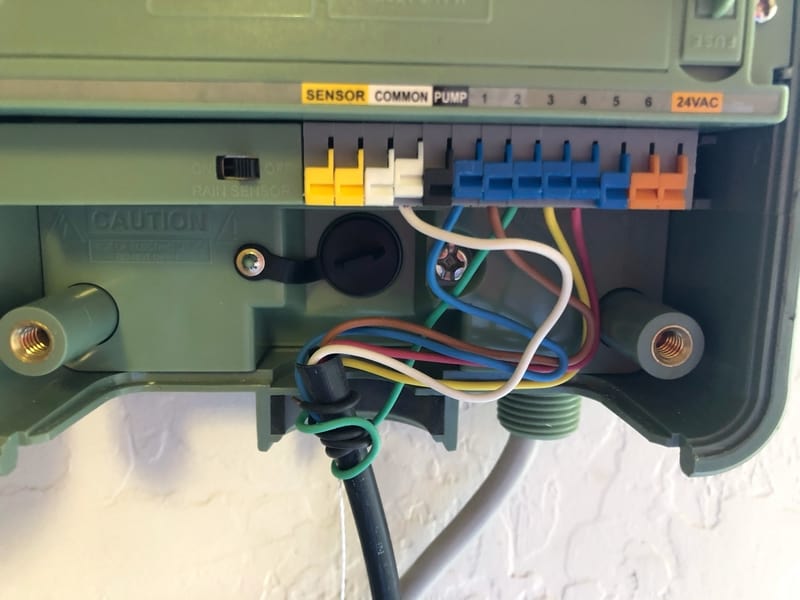
The wiring you ultimately purchase depends on the number of valves in your system, and you will need two more wires than valves. For example, in the picture below you will see five total valves. The minimum number of individual wires required in the wiring assembly for this setup would be seven (five valves plus two additional wires).
Each wire in the wiring assembly will be a different color, allowing you to match the valve (which controls a section of your sprinkler system – no more than five sprinkler heads) to a “zone” on the timer control box.
Each valve will have two wires attached. Take one wire from each valve and attach them to the white wire (neutral wire, or “cold” wire) from the wiring assembly using a waterproof wire nut (found at your local hardware store).
Next, simply connect the second wire from each valve to a colored wire (“hot” wires) using a waterproof wire nut, run the wire line to wherever you will be housing the timer control box (preferably near an outlet), cap any unused wires using a waterproof wire nut, and connect each individually colored wire to the wire receiver in the timer control box (commonly found near the bottom of the unit; picture below). You will need to strip the last half inch of each wire in order to safely connect them.
Once the wiring is complete, it is best to bury the wire under a small portion of soil to keep it out of the way. Simply trench a three-inch deep trench leading to your timer control box, run the line and cover.
Adjusting Water Flow the and Coverage
The first time you turn on the sprinklers, you will want to make sure you have adequate coverage for your lawn. I recommend at least 30% overlapping coverage from each sprinkler head in addition to confirming the base of each sprinkler head is receiving water from adjacent heads.
You can manually adjust most sprinkler heads via a flat head screw on the top of each individual sprinkler head. Turning it clockwise will increase the flow while turning it counterclockwise will decrease the flow. Simply take a flat head screwdriver and adjust each sprinkler head individually while the water is on (so you can see the coverage).
The reason I recommended 360-degree adjustable sprinkler heads earlier was for this step. The base of each of these sprinkler heads has an area where pliers can be used to turn the opening flow, or the start of flow. The end of flow can be manipulated by turning the ridged portion of each head towards the top of the sprinkler. This will allow you to adjust the coverage area of each head without having to plan ahead and buy pre-angled sprinkler heads!
Installing your own sprinkler system could save you thousands of dollars. For comparison sake, materials alone will cost $600-$1,200, depending on the size of your yard, while hiring a professional could cost upwards of $10,000-$12,000! With the right knowledge and inspiration, you too can save thousands and be left with a yard your family can enjoy for years to come!