

Installing kitchen cabinets is easier than you might think. Did you know your kitchen cabinets are held in place by four to six screws? Yes, that’s it! Now, there is a lot more that goes into a successful cabinet install than four to six screws, but I will give you the tips and tricks needed to ensure your new cabinets are installed like a professional!
Like every other home project, installing your kitchen cabinets first involves planning and gathering the required materials. First, lay out your kitchen design on scratch paper, paying particular attention to measurements to see how many of each size cabinet you need to order. Once ordered and delivered, inspect the new cabinets for any imperfections that could have arisen from the shipping process. Remove the old cabinets, find the low point in your floors, mark a level baseline on the wall, and set your base cabinets using shims to bring level where needed and working from the corner outwards. Attach one cabinet at a time to the wall using a stud finder and anchor screws.
Place the second cabinet in place, level with shims, attach to the adjacent cabinet using attaching screws and then affix to the wall using anchor screws. Repeat this process for the base cabinets and upper cabinets, adding a support ledger board for the uppers to help support their weight. Install the doors, drawers, shelves, and any trim, crown molding or hardware to complete the design.
The rest of this article will break down each step in an easy-to-follow and digestible manor, giving you the tools, motivation and confidence you need to install your very own kitchen cabinets! Before we begin, take a look at the “before” picture from my own kitchen. The “after” picture will come at the end of this article. Each and every step of my kitchen renovation, including the kitchen cabinet install, was done myself. Let’s get to it!
Tools and Materials Needed

- Tape measure
- Level (it is best to use a larger level; four to six feet is ideal)
- Drill and drill bits
- Screwdriver set
- Pencil
- Stud finder
- Clamps
- Pry bar or hammer
- Ledger board (a long, sturdy piece of straight wood like a 2x4x8; not required but helps the install!)
- Anchor screws (3 1/2″; self-drilling screws work best!)
- Attaching screws (1 1/2-2″)
- Shims
- Molding and Trim (part of the finishing process)
- Air compressor and finishing gun/nails (not required but helps speed up the finishing process)
- Sawzall or rotary cutting tool
Planning Your Kitchen Layout
The common theme to all our “How-To” articles here are DrillWarrior is proper preparation. Without a plan in place, the project itself could be placed in jeopardy. It is best to take the requisite time to plan a project in its entirety before ever swinging a hammer, digging a trench or getting into the demo work.
If your plan is to utilize the existing layout of the kitchen, by all means skip to the next step and order new cabinetry to match the size and shape of the existing cabinetry in your kitchen, or better yet, paint or refinish your existing cabinetry!
Because kitchen cabinets come in a multitude of shapes, sizes and designs, individual units can be fit together in a way that maximizes the space available in your kitchen. There are also several new pieces of cabinetry that have hit the market recently, so I highly recommend doing a quick search online to gauge what is available prior to ordering new cabinets.
Things like Lazy Susan corner units, pull out spice shelves or storage shelves, inlaid glass cabinet doors and easy close hinges can add function and value to a kitchen, while higher end finishes like wine fridges and built-in appliances will change the way you approach your particular kitchen cabinet overhaul, so knowing what is available on the market beforehand will give you a good idea of where you want the function and design of your kitchen to be when the final nail or screw goes in.
Now that you have an idea of how you want your kitchen to look when the renovation is complete, take measurements of the entire kitchen as well as where the cabinets, appliances and countertops will be set. The easiest route would be to not move major appliances as now you’re talking about plumbing, electrical, ducting, etc.
Once the measurements are taken, draw out the proposed layout on a scratch piece of paper or graph paper, paying particular attention to the width of cabinets available for purchase (unless the plan is to custom order cabinets to be built for your project, which is a valid, yet more expensive, option!) and how those pieces fit into the total negative space to be filled with cabinetry (both lower and upper).
With the blueprints complete, it is time to order your brand-new cabinets!
Tips For Ordering New Cabinets
Cabinets can be ordered in box kits, where assembly is required, unfinished and assembled, or finished and assembled, with a variety of different finishes available. If you are tight on time, I recommend ordering finished and assembled cabinets. If you are tight on budget, box kits might be your best option. Unfinished and assembled cabinets seem to be the best mix of both worlds and can be purchased through a cabinet store (either online or at a brick-and-mortar show room) or your local hardware store. They are significantly cheaper than the finished variety and allow you the flexibility to be able to finish them as you desire, whether that is prime and paint or stain.
If you ordered cabinets to be delivered, ensure you open every box and inspect each cabinet to check for any defects or flaws. Since ordered cabinets take time to be handled and shipped, it is best to do this when they first arrive to allow time for another round-trip delivery should one be defective.
The Process For Removing Old Cabinets
An important tip to removing old cabinets is to save them as best you can, so put down that sledgehammer and pry bar! Old cabinets can be repurposed in the garage, shed, game room or laundry room, sold online or donated to charity, so removing them in one piece should become the goal. And it is important to choose home improvement projects that will increase the value of your home. All you see on DIY home improvement shows is a person taking a sledgehammer to their old cabinets when, in reality, it is simply taking money directly from your pocket!
The good news, as you will soon find out, is that cabinets come out as easily as they go in! There are two sets of screws that hold the cabinets in place: small attaching screws used to secure cabinets to cabinets, and large self-drilling anchor screws that are used to affix the cabinets to the studs in the wall.
Removing Upper Cabinets
First, start with the upper cabinets and remove the attaching screws that are typically found on the inside front face of the cabinets, just inside the cabinet doors. With the cabinets no longer attached to each other, remove the anchor screws on one cabinet at a time (Pro tip: this process works best with a partner; one person to hold the cabinet and one to remove the screws. Be careful when that final screw is removed as the forty-pound cabinet is now susceptible to gravity!).
Continue along the uppers, removing one cabinet at a time through the same process. If you have backsplash installed and want to keep it intact, be careful when the final screw is removed. The full weight of the cabinet is now resting on your backsplash! In this instance, remove the cabinet by letting the top tilt towards you, giving yourself room to lift the cabinet up over the existing backsplash.
If you have an undermount microwave installed under an upper cabinet, leave that one until the end. You will need to remove the microwave prior to removing that cabinet from the wall.
To do so, open the cabinet above the microwave to reveal two long stability bolts. These are used to hold the microwave in place while the majority of the weight of the microwave rests on the load-bearing support attached to the wall (which is basically a long metal support with a J-hook on the bottom).
Again, this step works best with a partner. Have one person hold the microwave in place (when the two stability bolts are removed, the microwave is going to want to tip towards you) while the other person removes the stability bolts. Once removed, allow the microwave to tilt towards you before lifting the unit up off of the J-hook support, in a similar fashion as was discussed when removing upper cabinets over a backsplash.
If you are keeping the microwave in the same place, keep the metal support J-hook in place. With the microwave now removed, remove the final upper cabinet before proceeding to the lowers.
Removing Lower Cabinets
To remove the lower cabinets, you will first need to remove the countertop. For solid stone countertops, simply apply upward pressure on each section of countertop until the bonding agent (construction adhesive or glue) gives way.
For fabricated countertops, now is where that sledgehammer (or hammer/mallet) and pry bar come into play! The tensile strength of fabricated counters is much, much lower than solid stone, meaning the counters are likeliest to come out in multiple pieces (hence the sledgehammer and pry bar). Work your way around the kitchen removing all counters until left with the under support (typically pieces of ply wood).
The ply wood base is used to spread the load of the weight more evenly across the top surfaces of the base cabinets and provide an even surface for the counters to be attached to. This will also need to be removed prior to removing the base cabinets. To do so, work your pry bar between the upper portion of the cabinets and the lower part of the ply wood and it should pop right up.
Perform Any Repairs or Updates Needed
Okay before I get into the specifics of this repair, I would like to show you some pictures of how I lowered my microwave in my own kitchen project. In the first picture you will see how I lowered the cabinate above the microwave.
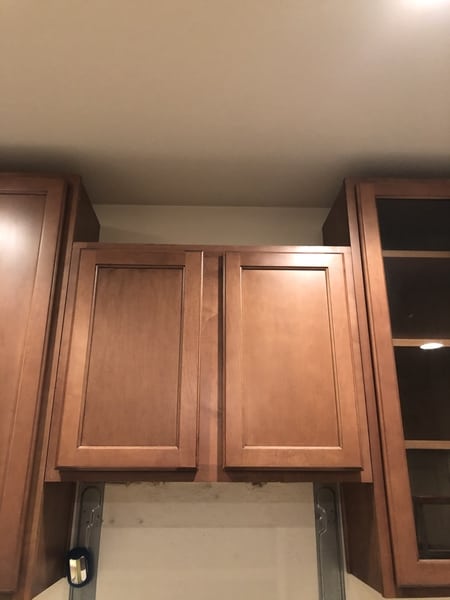
And then you will see how I filled the space.

Okay, now back to what we were talking about. With the cabinets now removed, if there are any repairs or big picture design changes that need to be done, now is the time to do so. Moving appliances, electrical or plumbing, repairing drywall, priming and/or painting walls, basically anything other than flooring that needs be done, fixed or changed prior to the kitchen taking shape should be done with the cabinets out.
The reason you don’t want to install flooring before the new cabinets go in is the base cabinets need to be exactly level and the best way to do that is to place them directly onto the slab or subfloor. Tile, hardwood or vinyl often have surfaces that aren’t exactly level which could throw the entire project of kilter.
If installing new backsplash, a single coat of primer will give the wall the best bonding capacity for the new backsplash, so that is a step I highly recommend not skipping (and is best to do with the cabinets not yet on the wall!).
Install Lower (Base) Cabinets
There are differing opinions on whether it should be the base cabinets or the upper cabinets that go in first. My personal habit pattern (and recommendation) is to install the base cabinets first.
The reasoning is quite simple: the base cabinets (and how level they are) form the base of the entire kitchen. If they are installed improperly, the rest of the kitchen will suffer. Everything else in the kitchen revolves around the base cabinets, including how the appliances fit in, the countertops, backsplash, the ability to level the upper cabinets, etc, all depend on the first base cabinet you set.
The argument for installing the uppers first is also quite simple: it is easier – you can get a step ladder into the required areas with greater ease. To me and my installs, getting the base cabinets right is more important than the little inconvenience of having to work a ladder around the base cabinets when installing the uppers. Ultimately, it is entirely up to you to decide which cabinets to install first, and there are legitimate arguments for both sides.
We’re going to cover the base cabinets first as it is my preferred way to attack kitchen cabinet installs.
Like I alluded to earlier, the entire function of the kitchen design revolves around the base cabinets. For that reason, it is extremely important to ensure each and every cabinet that is installed is precisely level and flush.
The first step to setting your base cabinets is finding the low point in your floor (depending on a multitude of factors, your floors may not be exactly level). Place your level across the floor and check for level in all areas cabinets will rest.
Once you have found the low spot, lift one side of the level until it shows precisely level and mark it on the wall. Continue this process for the entire length of wall where cabinets will rest. Once level is outlined on the wall, simply connect the dots using a straight edge or the level itself. This will be your baseline. Standard base cabinets are 34 ½” tall, so measure that distance from your baseline up the wall and mark a parallel line on the wall. This will be the top baseline.
Starting with the corner cabinet, set the cabinet in place and utilize shims to bring the bottom of the cabinet flush with your top baseline line on the wall. Don’t worry about any gaps on the bottom of the cabinets as a simple toe guard or kick plate will hide all the imperfections!
After checking for level by placing your level on top of the cabinet with the shims in place, check for studs in the wall using a stud finder and mark their positioning on the wall. Next, affix the cabinet to the wall utilize self-drilling anchor screws into the studs. Your first cabinet is set!
Bring in the next adjoining cabinet, set it into place, and repeat the same process to find level. With the second cabinet level, clamp the two adjacent cabinets together using a standard C-clamp or vice clamp and pre-drill pilot holes into the side of the front of the cabinet, just behind where the cabinet door would be (the same spot on the new cabinets as attaching screws you removed when removing your old cabinetry).
Attach the two cabinets together using your attaching screws and then affix the second cabinet to the wall using the anchor screws into a stud. Repeat this process for the entirety of the base cabinets, making sure to leave the requisite space for your appliances. Don’t worry about replacing the plywood on top of the cabinets, your countertop installers should take care of that step!
For the base cabinets that will be installed around plumbing or electrical, such as those for the sink, those around any gas plumbing if you have a gas range/oven, and those around the dishwasher, simply measure and cut out holes in the back of the cabinet where the requisite plumbing or electrical will protrude. Remember, measure twice and cut once!
Install Upper Cabinets
The process for installing the upper cabinets is very similar to the lowers, with a few additional steps. The standard height of the bottom of the upper cabinets from your bottom baseline is 54″, but if you have the ceiling height, I highly recommend increasing that distance as much as possible.
The area above upper cabinets is oftentimes wasted space, so pushing the uppers higher gives you room between the uppers and base cabinets for exposed shelving, open shelving or floating shelving, all of which add a unique design element to any kitchen (on top of the added function and value!).
Bottom line is to establish you upper cabinets’ baseline in a similar fashion as you did with the base cabinets and mark it on the wall. After the baseline is outlined, it is my recommendation to screw a ledger board into the wall to give you something to rest the heavy upper cabinets on during the install. This will simply be removed after the cabinets are affixed to the wall.
It is also worth mentioning that this part of the job is best accomplished with help, especially if you elect not to utilize the ledger board technique. One person will hold the upper cabinet in place while the other person screws them both together and into the studs in the wall in the same manor as was utilized with the base cabinets.
From here on out, the process is the same as the base cabinets: level, clamp, pilot holes, attaching screws then anchor screws.
Install Cabinet Doors, Drawers and Shelves
Once all cabinets are attached to each other and affixed to the wall, remove the ledger board and begin attaching the cabinet doors, installing any drawers and placing any shelves. This process should not take very long. The biggest mistakes made on this step involve not taking your time with the alignment of the doors.
Take your time, measure twice, and do it right the first time! Most cabinet door hinges can be adjusted without removing and resetting the hinge itself via a Phillips screwdriver and two screws, one in the front and one in the back, that adjust the tilt of the hinge.
Drawers should all slide in seamlessly on all prebuilt cabinets and interior shelving should fit right in as well.
Finishing Touches
The final touches involve placing the toe kick (or kick plate, as it is sometimes called) using finishing nails, painting or staining depending on if you ordered finished or unfinished cabinets (quick side note, it is best to paint or stain the cabinet doors before they are installed!), installing the hardware (pulls and knobs, if desired), and installing any trim or crown molding (if desired). Trim and crown molding are inexpensive ways to add a high-end feel to the kitchen, so we will discuss those installs below.
With the right knowledge and motivation, you can install your own kitchen cabinets and give your kitchen the update it deserves for a fraction of the cost of hiring professionals!
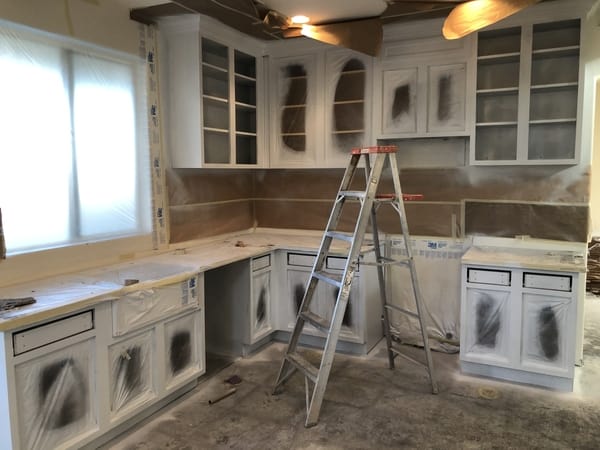
Here is what my kitchen looked like in the heat of the action:
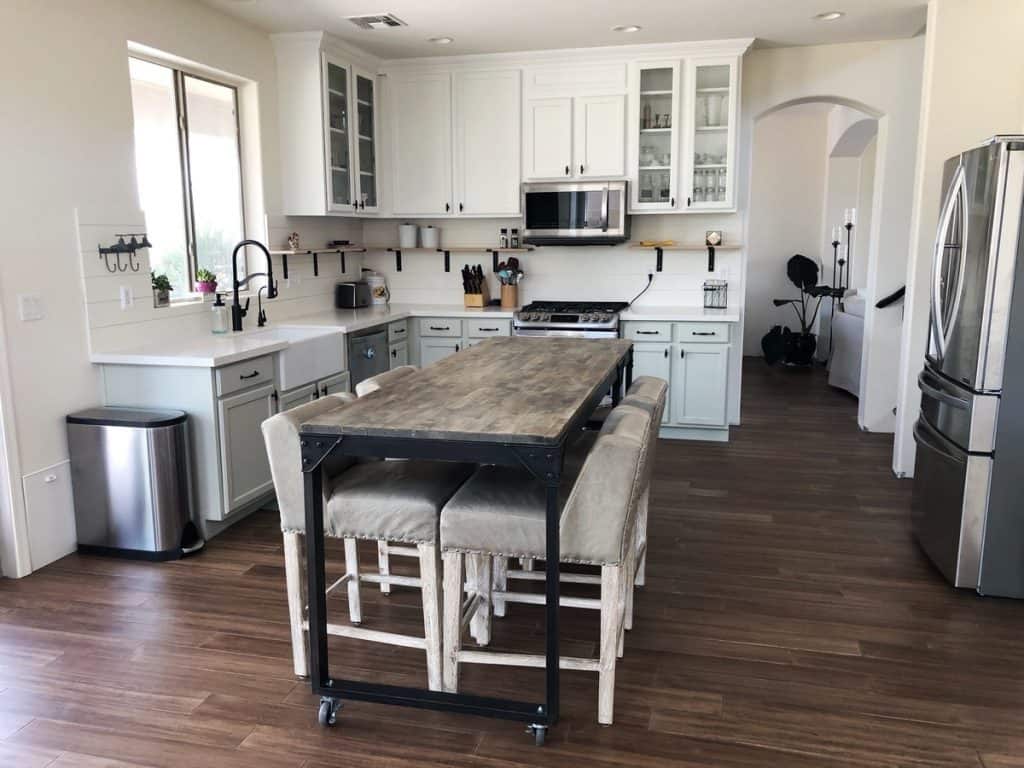
And then here is the finished product:
Related Kitchen Installs
Removing Kitchen Island or Peninsula
Removing an existing kitchen island or peninsula oftentimes makes the kitchen appear bigger by removing the boxed-in feeling. Ultimately, it is over to your particular wants, needs and design.
The reason this gets its own section in the article is usually kitchen islands and peninsulas contain the dreaded internal electrical. First, turn off the electrical to the kitchen area using the circuit breaker. Once the electricity is off, remove the kitchen island the same way you removed the lower cabinets, using a sledgehammer for any walls or internal 2x4s.
Finally, cut the electrical wiring and cap each wire individually using standard electrical caps, use electrical tape to secure the wiring into the electrical conduit in the slab or subfloor and install flooring to match the rest of the kitchen. Kitchen island no more!
Consider Installing Crown Molding
Crown molding is an extremely cost-effective way to add a high-end look to your new kitchen (materials can be purchased at your local hardware store for under $50 in most cases!).
Simply cut and install 1×2” strips of wood to the back of the top front edge of the cabinets with finishing nails (which gives you room to attach the molding), attach the crown molding to the top of the cabinets using finishing nails, and paint or stain to match your cabinets. It’s as easy as that!
Pro Tip: If you are planning on installing your upper cabinets close to the ceiling, leave enough space for the crown molding (typically one to two inches) so that each edge of the crown molding rests flat.
Backsplash
From a pure design perspective, backsplash has become rather cookie-cutter. We see the same materials recycled through house after house. Think of the backsplash in your kitchen as one of your main canvases as this is typically the first thing that catches the eye.
In the finished product in the transformation seen in this article, you can see standard shiplap was used in a horizontal pattern and painted white as a means of continuity (just make sure to seal the materials used for the backsplash properly, because water and most materials do not mix well!). It was designed to connect the two-toned lower and upper cabinets seamlessly by not breaking the kitchen into two pieces, thusly creating the appearance of a larger kitchen.
In smaller kitchens, keep the backsplash light and bright to create the illusion of size. For kitchens with monotone cabinets, a bright backsplash or one with a lot of “pop” creates the emphasis point. Let your imagination run wild!
For standard backsplash installs, visit our sister article found here. For non-standard materials, choose the method of affixture that makes the most sense, caulk and seal.
Open Shelving
Open or floating shelving adds a modern feel to any kitchen design by making the kitchen appear taller and more open through extension of the sight-lines for the eye. The additional storage and ease of access also add utility and are an easy and inexpensive way to add value to your kitchen (wood and mounting brackets can be purchased from your local hardware store for under $50!).
If your kitchen has tall ceilings (nine feet or higher), this can be accomplished by simply installing the upper cabinets closer to the ceiling, creating the space required for the open shelving underneath. If the ceilings in your kitchen are a more standard eight feet, the room for open shelving can be created by ordering shorter upper cabinets or by utilizing floating shelving (shelves installed with no visible mounting hardware).
Any piece of wood can be used for the open shelving, but I recommend a hardwood to be able to better withstand the weight of whatever will be placed or stored on the shelves. Stain or paint the shelves to match the design of your kitchen and install the mounting brackets directly to the studs in the wall. Finally, cut the shelves to length and place them on the mounting brackets.
Pro Hack: An inexpensive, quick way to update the overall look of your cabinets without completely replacing them is to order new cabinet doors. Simply measure the existing doors, order new ones to replace them in any finish and look you desire, paint the empty cabinets to match, attach the doors and add new hardware for a speedy makeover!