
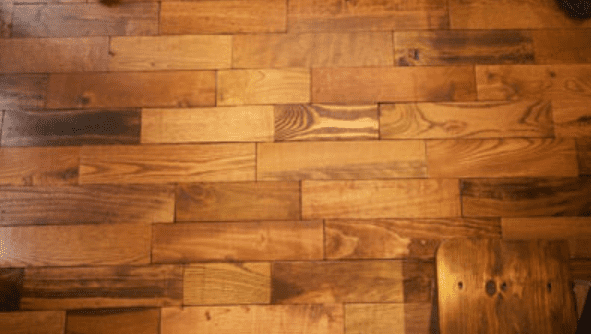
A wooden floor can be an exceptionally beautiful part of your home and it is possible to make a wood floor yourself using recycled shipping pallets. Installing pallet flooring in your home is a lot of hard work, but the results can be amazing and something that you will feel proud of accomplishing.
To install flooring made from recycled wood pallets, the first step is to collect enough pallets to cover the entire floor. Next you must disassemble the pallets and cut or plane the boards so that they are a uniform thickness and shape. Then you can lay the boards and attach them to the subfloor. The last step will be to add a finish to the pallet wood floor.
Are you ready to start building a beautiful pallet wood floor in your home? Follow these instructions carefully and you will be able to install an amazing floor from recycled pallets.
Where to Find Pallets
Many businesses use pallets for shipping goods. You will often see them on the curb outside of a loading dock. It is always best to ask the employees of the business if you can take pallets.
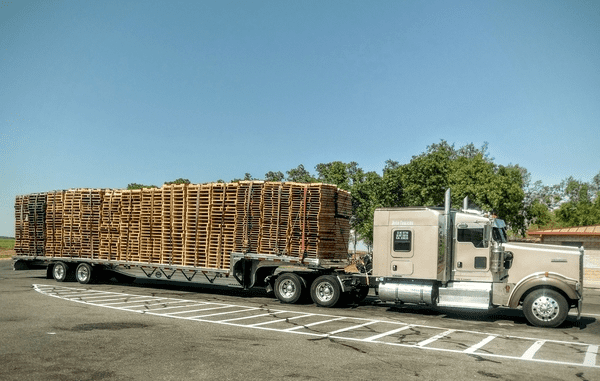
Depending on the size of your floor, you might need a lot of pallets and it could take you a long time to collect enough. It might be easiest to take the collection process slow, like over a few months. Whenever you see a pallet on the sidewalk, you can grab it and soon you will have enough for your flooring needs.
You could also go pallet hunting on a free day. You will need a truck or trailer that can hold lots of pallets. To fit more pallets you could also bring along some tools and take the pallets apart in the field, just be sure to clean up after yourself.
A standard pallet will contain about two square feet of flooring material. So for a 100 square foot floor you would need at least 50 pallets. You should plan to break a few boards or find unusable boards on the pallets, so collect more than you calculate you will need.
How to Select Safe Pallets
It is good to be choosy about the pallets you select. Finding pallets with higher quality boards that are the same width and the same thickness will make the rest of your project much easier.
Pallets used for international shipping have an International Plant Protection Convention(IPPC) stamp on them with some identifying codes. The codes will tell you the origin of the pallet, and how it was treated for insects.

The symbol you need to pay the most attention to is how the pallet was treated for insects:
- MB = Methyl Bromide
- DB = Debarked
- KD = Kiln dried
- HT = Heat treated
Never choose a pallet that was treated with methyl bromide. It is a strong insecticide and could be bad for your health, especially if you will be sanding the boards, which will release the chemical into the air for you to breathe. You might also look out for and avoid a CT symbol, which would mean chemically treated.
Avoid painted pallets. You just don’t know what the condition of the wood under the paint is.
Any other pallet is generally safe to use.
Pallets with no identification label are normally domestic pallets and are not usually treated with any chemicals. These pallets should be safe to use.
Only select pallets that are dry and have not been left out in the rain. Make sure you can store them in a dry place if you are not going to use them right away.
Disassemble the Pallets
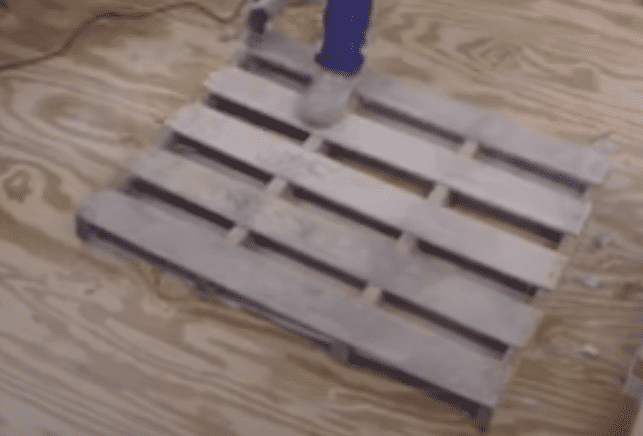
Select boards that are all the same width and thickness to take off of the pallets to use on your floor. This will make the rest of the work much easier. Spend your time on boards that look good and that you will want to use on your floor. If any boards are ugly, damaged or misshapen, don’t bother taking them off.
(Video On How To Disassemble Pallets)
With a hammer and a pry bar you will be able to take apart pallets to get usable boards. Use the pry bar to get underneath the deck boards and lift up to get the nails out of the stringer board.
The boards can be pretty tricky to remove, but keep working at it and you will find a technique that works well for you. Where I come from pallets are mostly made from Douglas Fir, a softwood that is easily damaged when trying to pull the pallet apart. Be careful with your boards so that they will not get damaged and you will be able to use them on your floor.
If you have access to an electric circular saw, you might try cutting the boards off of the pallet. You will lose a few inches of wood from the board doing this, but it will be faster and easier. To get as long of a board as possible, cut the deck board off of the two outside stringer boards, then you can use the leverage you have to wiggle the deck board off of the center stringer board.
It is probably best to remove all nails or staples completely from the boards so that they will be free of any metal and you can saw them later without damaging your blade. In the end you will have just boards with a few holes in them from where the nails were.
Flatten and Shape the Deck Boards

To create your pallet floor you need to make each board the same thickness and width. You don’t have to make every board the same length, but you can if you want that look.
If you’re using boards that have varying widths and thicknesses, it will really help to have some pretty heavy duty power tools like a surface planer, a miter saw, a table saw and power sanders. Reshaping boards will take a lot of time, and if you don’t have access to tools already, a lot of money to rent or buy the tools. You are better off selecting boards that have a uniform size.
Make sure that the edge of each board is square, meaning that all of the corners are 90 degree angles. If the edges are not square, the boards won’t fit together tightly on the floor and you will have a lot of gaps to fill.
To make the boards square, you can use a framing square or a speed square to draw a square line and then cut the board freehand. This can be pretty tricky though, and you might need a miter box which will hold your board and guide the saw blade at the correct angle to make the cut square.
If you have a lot of edge cuts to make square, it may be worth it to rent or buy a power miter saw that will help you make perfect cuts every time.
Also look at the long edges of the boards, if they are not straight it will cause big problems when you are laying down the flooring. This is where a table saw will be really helpful. Be very careful with a table saw, I was reminded of their dangers by my friend as he showed me his finger nub.
Cut the crooked edge with the table saw, the minimal amount so that it will be straight. Once all of the boards have one straight edge, set your table saw gate so that you can cut off a little bit from the other side of each board and all of the boards will end up the same width.
You may want to give your boards a rough sanding just to make them a little more flat so they will all lay down better and be more smooth on top. If you really want a professional looking hardwood floor it will be best to run the boards through a planer.
Planers are pretty expensive tools and it is probably not worth it to buy one just for one job. You could borrow one from a friend or rent one for a day if that is an option. The planer will take off a thin layer of wood and leave you with a much smoother and prettier surface.
Prepare the Subfloor
You need to remove all of the old flooring before you put in your new floor. You should also carefully remove and save the trim.
Make sure that the subfloor is completely flat. If there are any low spots in the floor, more than 1/8 inch difference, you should put down some floor leveling compound.
The subfloor needs to be completely clean before you start laying down your boards. You may want to do a dry run without attaching the boards to make sure that you have enough boards and to see what sort of a pattern you want.
You could take this time to plan out exactly how you want the boards laid and you could make end cuts so that each row fits the way that you want. Just make sure to label the boards if you have a certain order so that it is easy to put them down the right way later.
You will also need to install a vapor barrier to protect your wood floors from moisture coming up through the floor. According to Easiklip, Moisture can destroy hardwood floors. It causes cupping, warping, and even mildew if not treated. You must install a moisture barrier to protect your flooring from water wicking up from below.
Installing Pallet Flooring Over Wooden Subfloor
You can use finish nails, flooring adhesive or both to attach the planks to the subfloor. Nails could be the easiest choice because if the boards are a little bent or twisted the nails will hold them down.
You need to put two nails in the end of each board, then space nails every ten inches across the board. After hammering the nail into the board, use a nail set to countersink the nails into the board so there is no metal sticking up.
Installing Pallet Flooring On Concrete
You can use a flooring adhesive that has a vapor barrier in it to install pallet flooring on top of a concrete subfloor. Spread the adhesive evenly onto the floor and then put the boards in place.
If some boards are a little bent and not sticking down flat, you can put a heavy object on top of the board to hold it flat until the adhesive dries.
Follow the instruction on the flooring adhesive for drying times, it usually takes overnight.
Finish the Floor
For a rustic look you could leave the boards unfinished, but they will be more susceptible to damage and stains. Most people will like the look of sanded and finished pallet wood floors.
If your floor is small, you may be able to sand it with hand tools, but it will be a lot of work and will make your hands very tired. You will get the best results by renting a drum sander. Be very careful with a drum sander, follow all of the instructions and never sand in one place for too long as you will create a dip in the floor.
Next clean up all of the dust and apply a coat of finish to the floor. It may take two or three coats to get the finish that you want, leaving time for drying in between coats.